Seamless customer communication plays a vital role in business success, and managing inbound calls efficiently can significantly improve customer experience. An Interactive Voice Response (IVR) system helps automate call handling by guiding callers through pre-recorded prompts and directing them to the right department or action without human intervention. In this guide, we’ll explore how to configure an IVR system in Kanamé using workflows, whether through a prebuilt IVR recipe or by creating one from scratch.
What is the IVR System?
An Interactive Voice Response (IVR) is an automated phone system that interacts with callers through pre-recorded messages, text-to-speech prompts, and keypad inputs. It allows businesses to guide callers to the right department, collect information, or provide self-service options without human intervention. In Kanamé, IVR is set up using workflows, enabling automated call routing and customer engagement.
To better understand how IVR works within workflows, refer to the table below, which outlines the key triggers, actions, and conditional logic used to build an IVR system.
IVR Component
Function
Use case
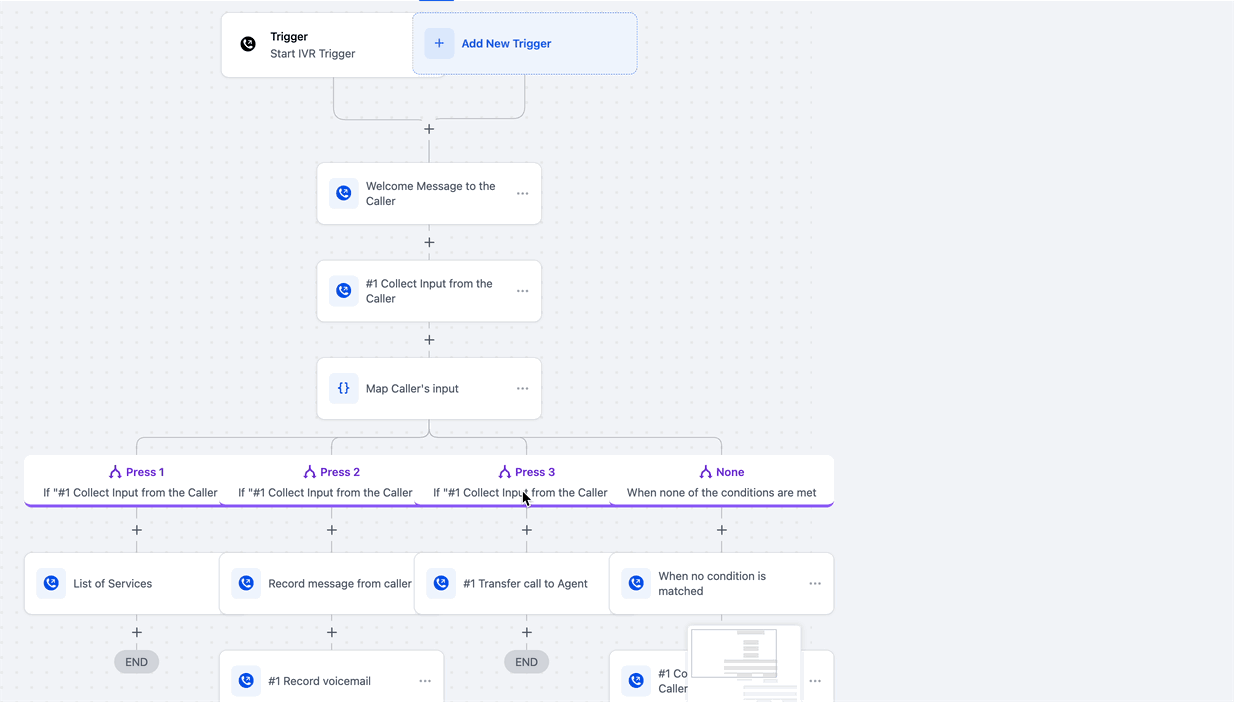
Trigger - Start IVR
Activates the IVR system when a call is received on a designated number.
A customer calls the business number, and the IVR workflow begins.
Action - Say/Play Message
Plays a recorded or text-to-speech message to guide the caller.
“Welcome to XYZ Company! Press 1 for Sales, Press 2 for Support.”
Action - Gather Input
Collects user keypress responses for navigation within the IVR menu.
Caller presses 1 for Sales, 2 for Support.
Condition - Map Caller Input
Directs the caller to the appropriate action or team based on input.
If 1 is pressed → Route to Sales Team, if 2 → Route to Support.
Action - Connect Call
Transfers the caller to a selected agent, department, or external number.
After pressing 1, the call is forwarded to a sales rep.
Action - Record Voicemail
Allows callers to leave a voicemail if no one is available to take the call.
If agents are unavailable, the IVR prompts the caller to leave a message.
Condition - Call Status Check
Determines what happens based on call outcome (answered, missed, or disconnected).
If unanswered, play a message and offer a callback option.
Key Benefits of IVR
- Enhanced Call Management: Automatically directs callers to the appropriate team, reducing wait times and improving customer experience.
- Improved Efficiency: Eliminates the need for manual call handling, freeing up staff for higher-value tasks.
- 24/7 Availability: Enables businesses to handle customer inquiries at any time, even outside business hours.
- Customizable Interactions: Supports text-to-speech messages, call routing, voicemail collection, and data gathering based on caller input.
- Seamless Workflow Integration: Works within Kanamé’s automation system to trigger actions like follow-ups, appointment scheduling, or lead categorization.
Configuring IVR Using Workflows
Setting up IVR in Kanamé can be done in two ways: using a workflow recipe for quick setup or creating one from scratch for full customization. Below, we explain both methods:
Method 1: Using the IVR Workflow Recipe (Faster Setup)
If you want a prebuilt IVR structure to save time, you can use the IVR Workflow Recipe, which includes predefined triggers, actions, and conditions.
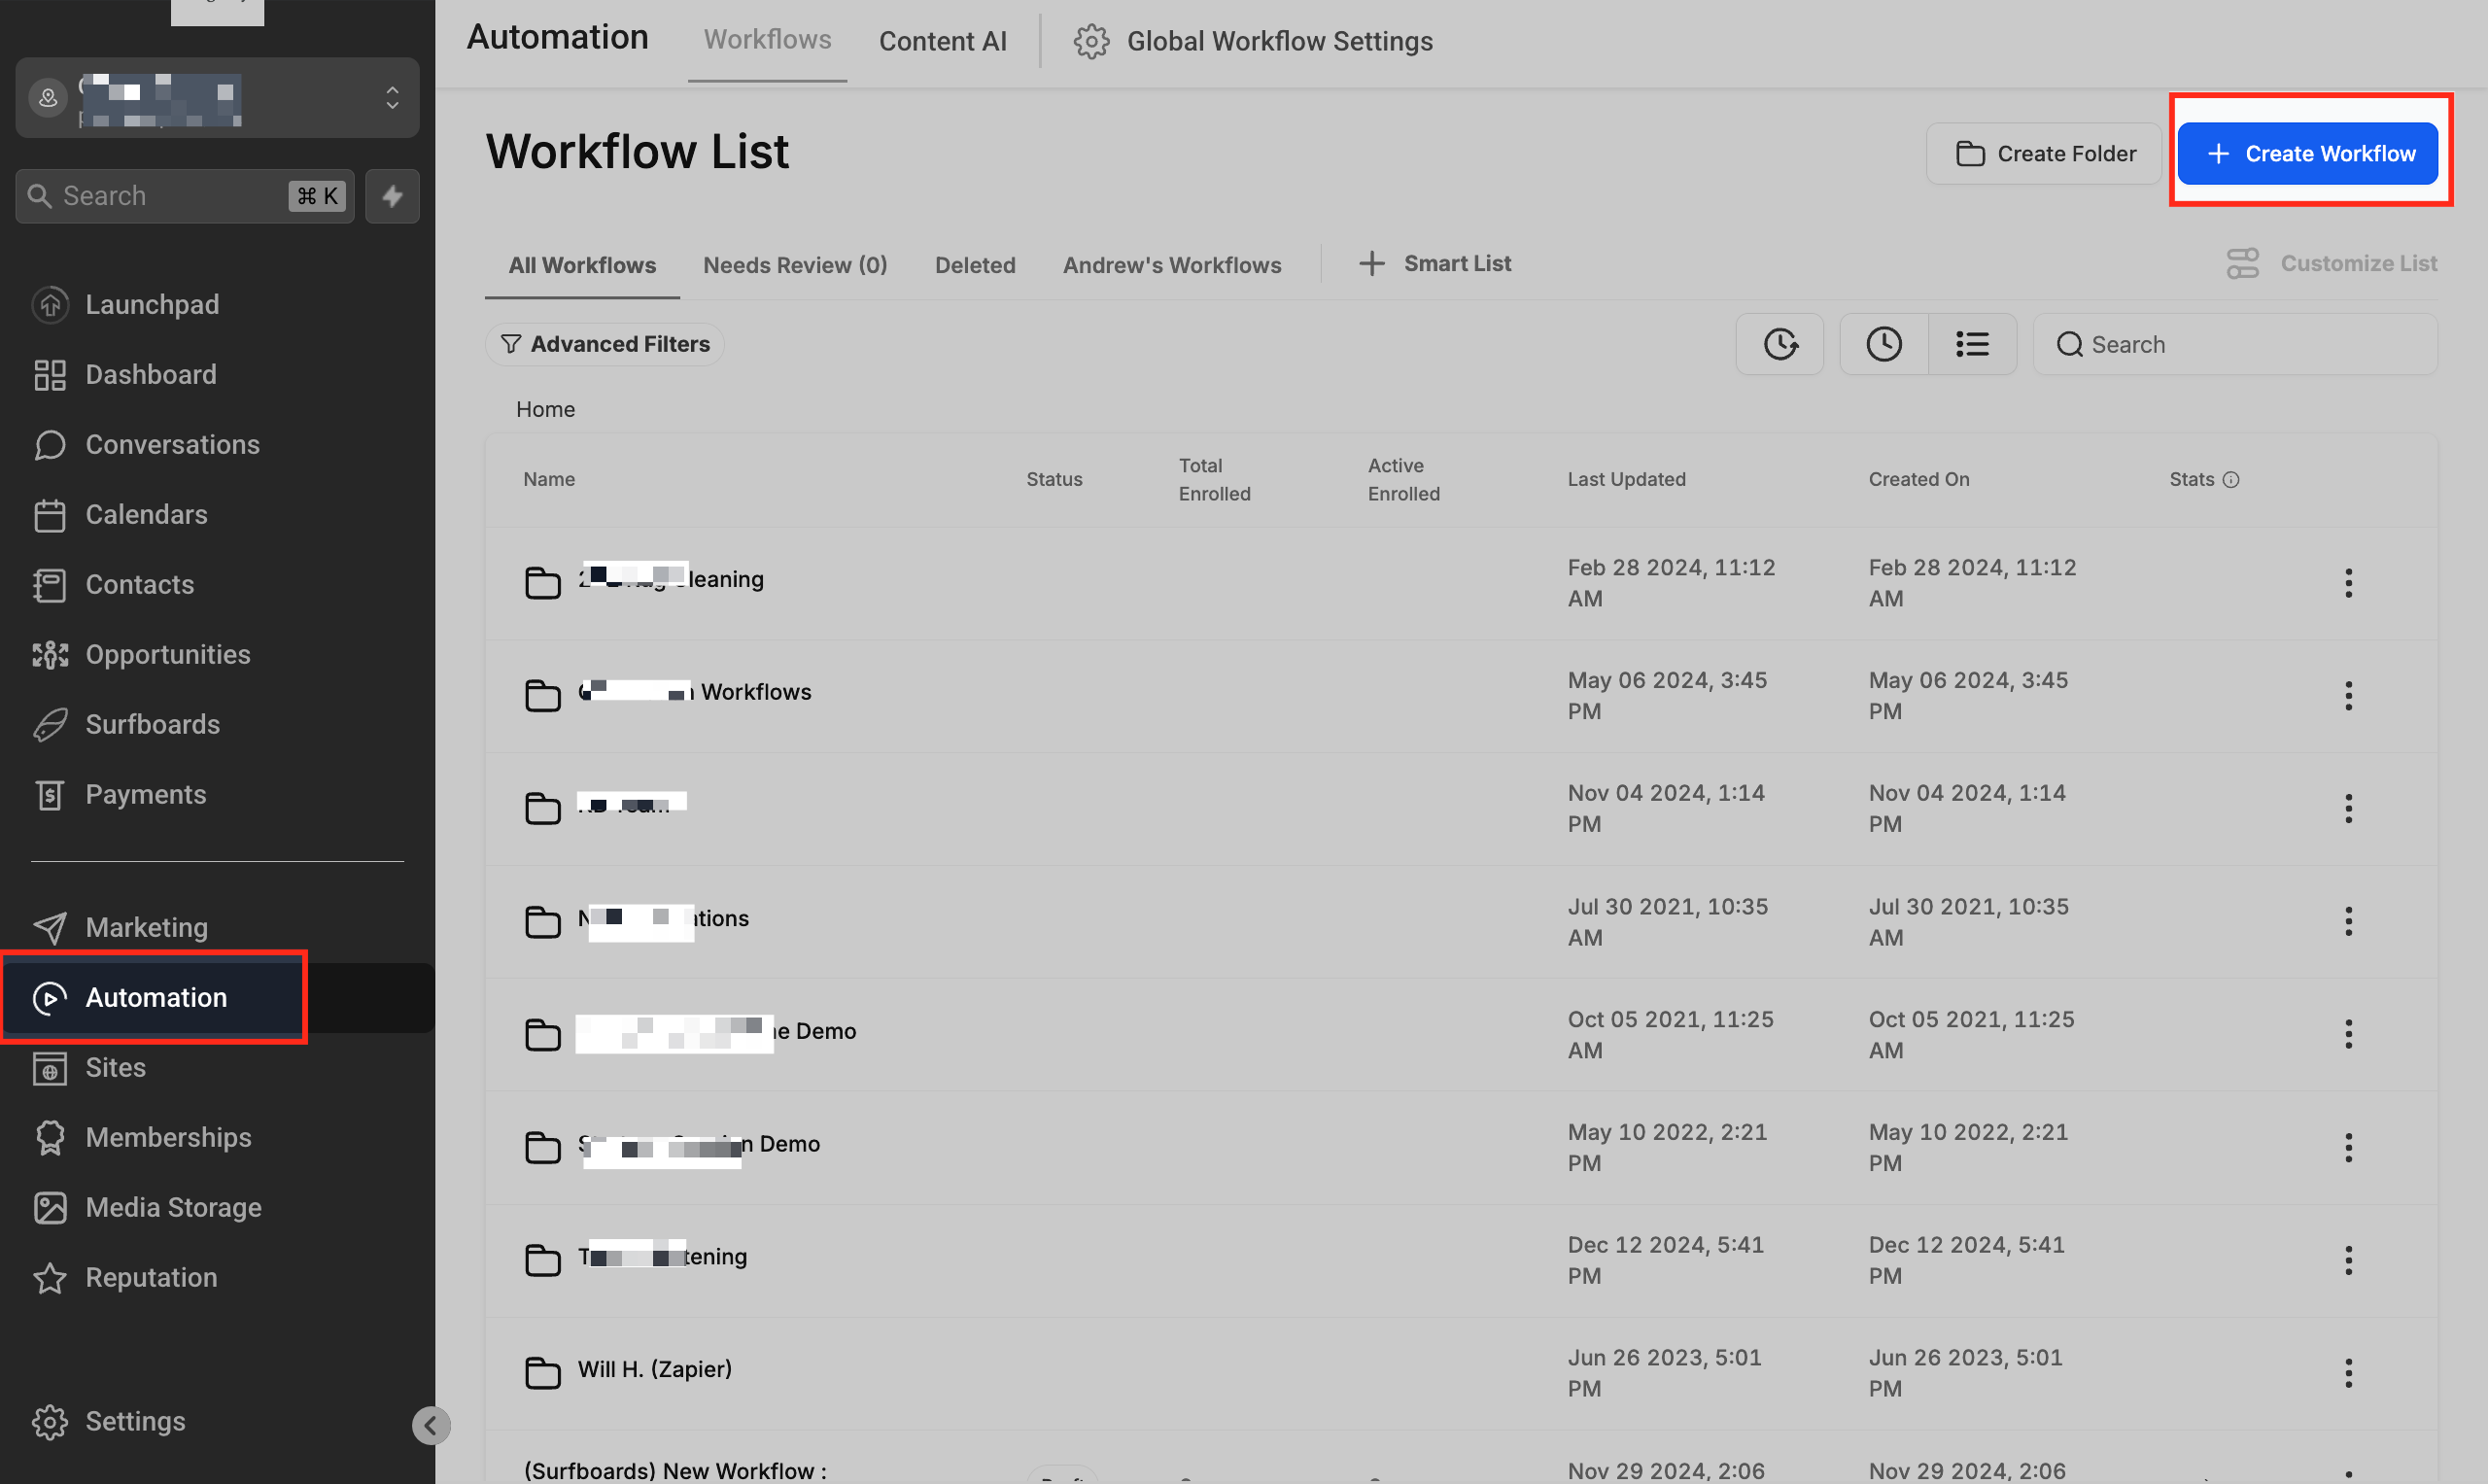
Navigate to Automation from your Kanamé dashboard. Click Create Workflow, then click Select a Recipe option to quickly set up a preconfigured IVR system with minimal adjustments.
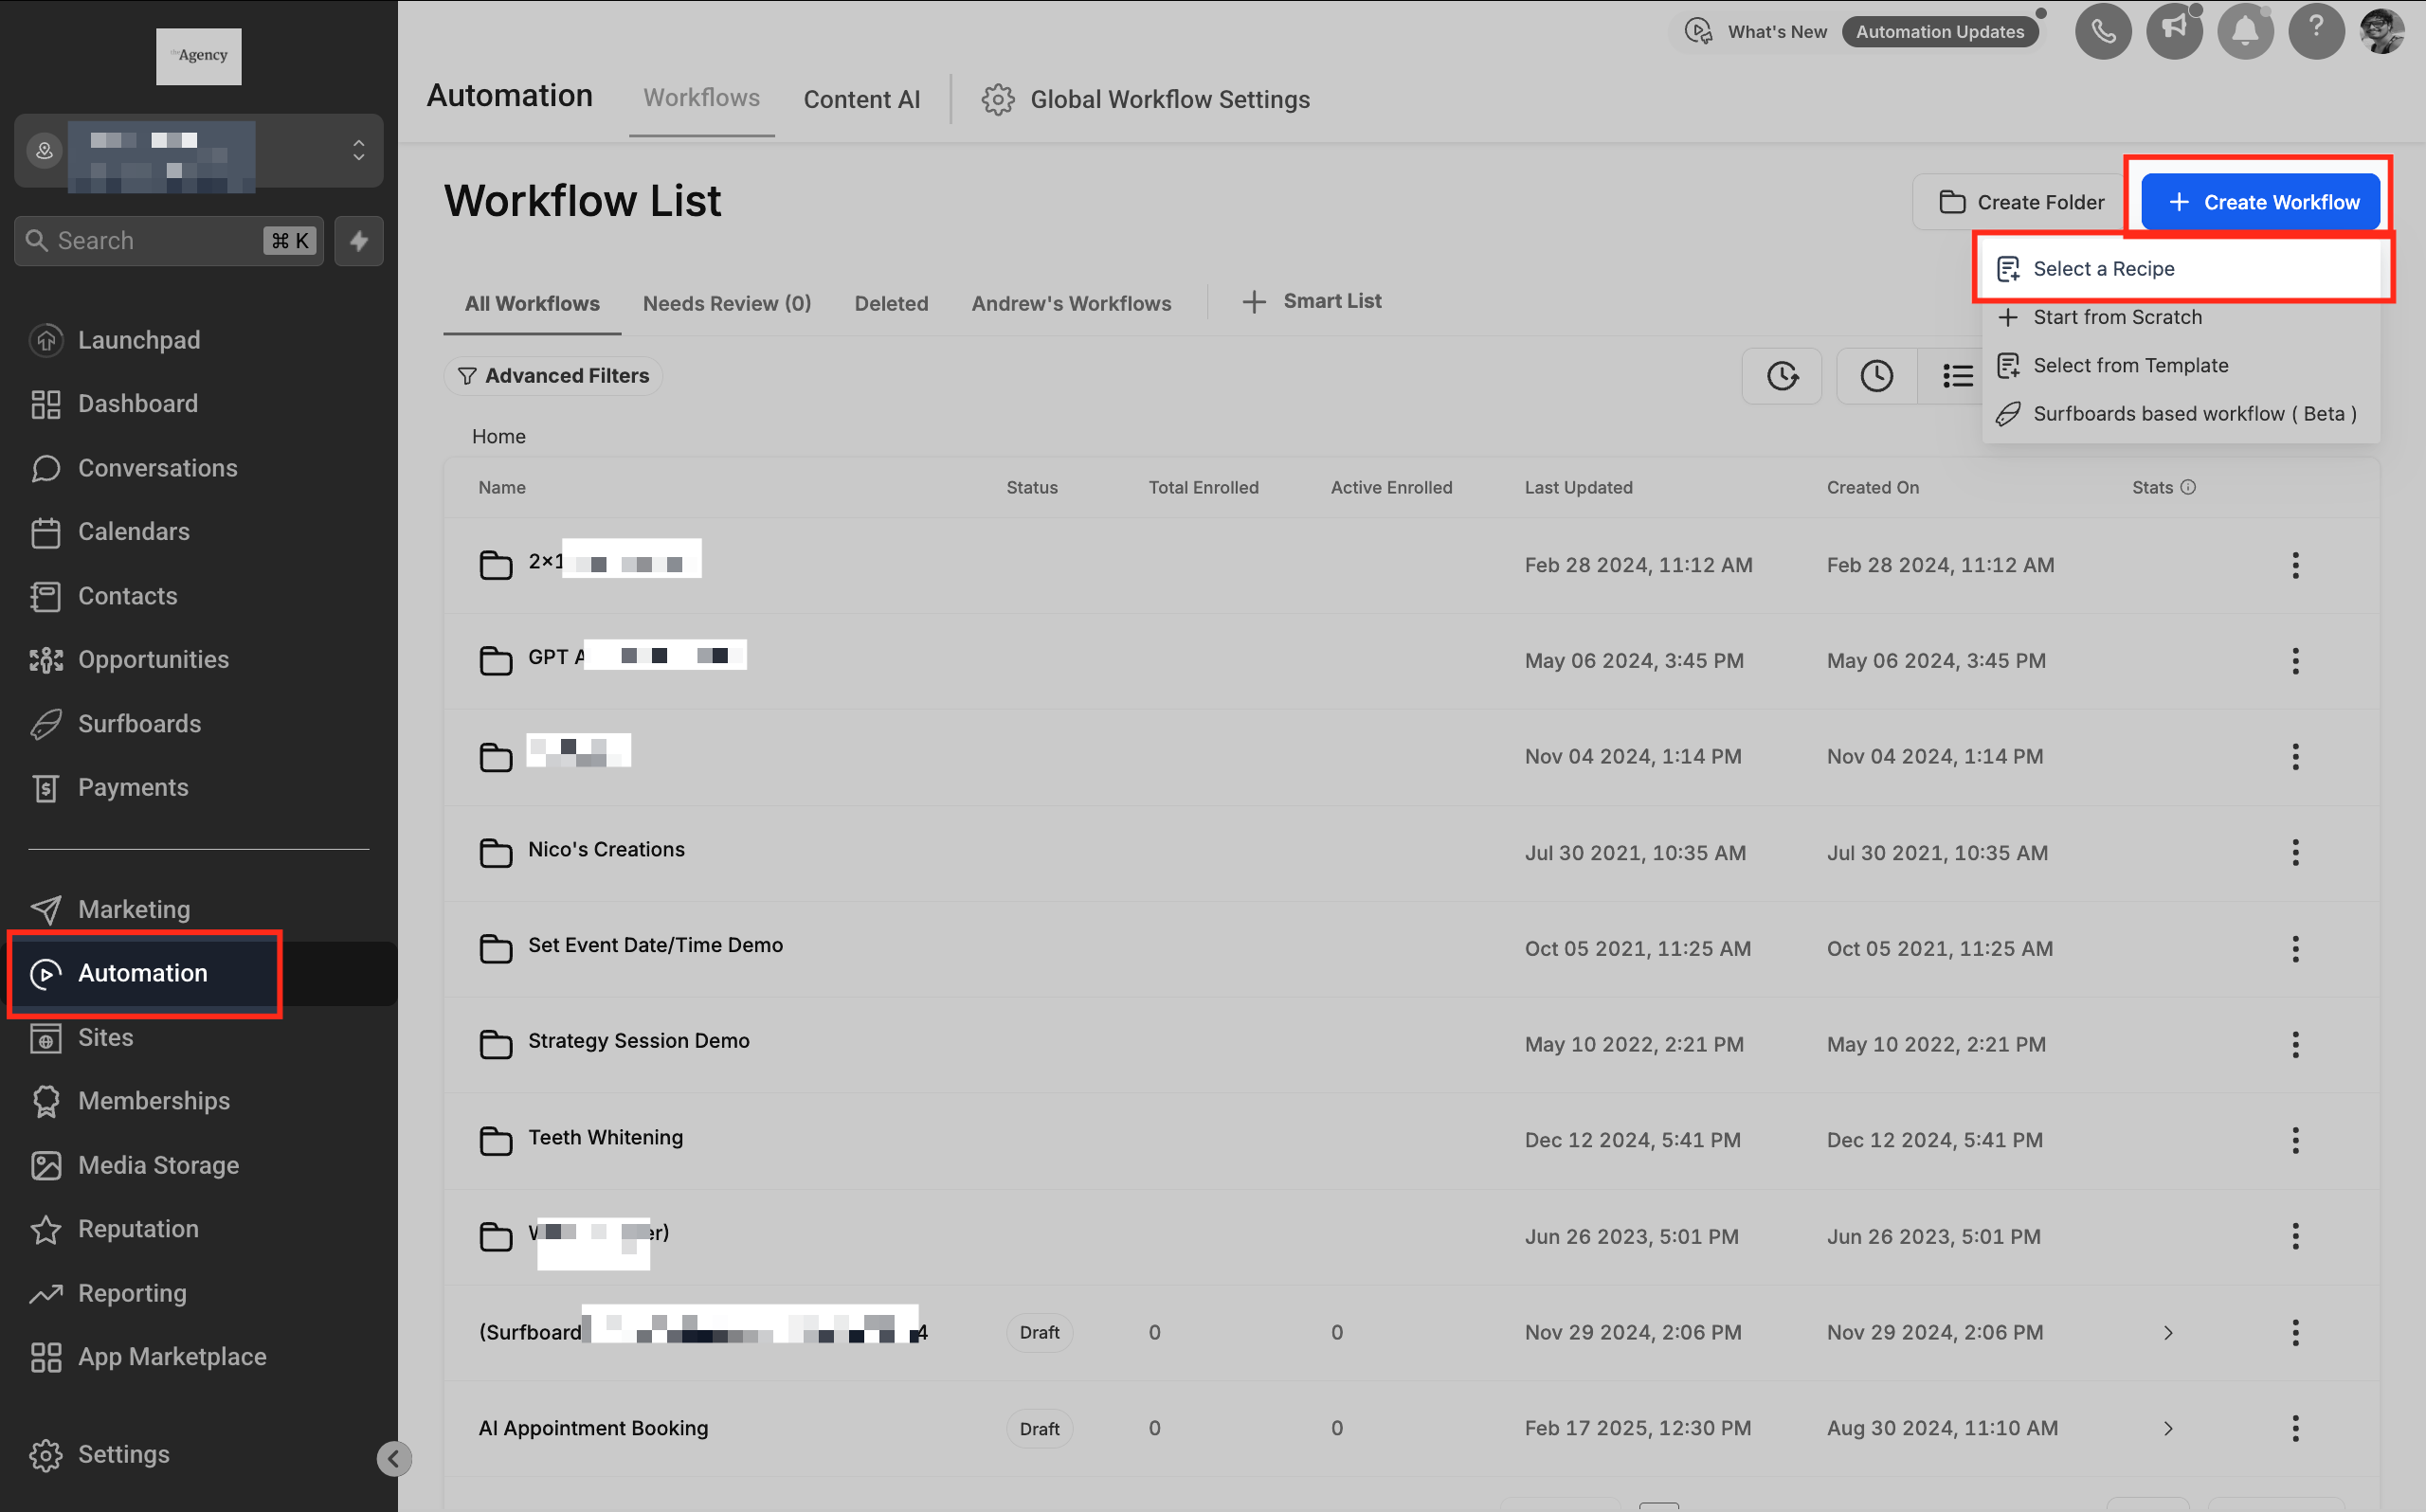
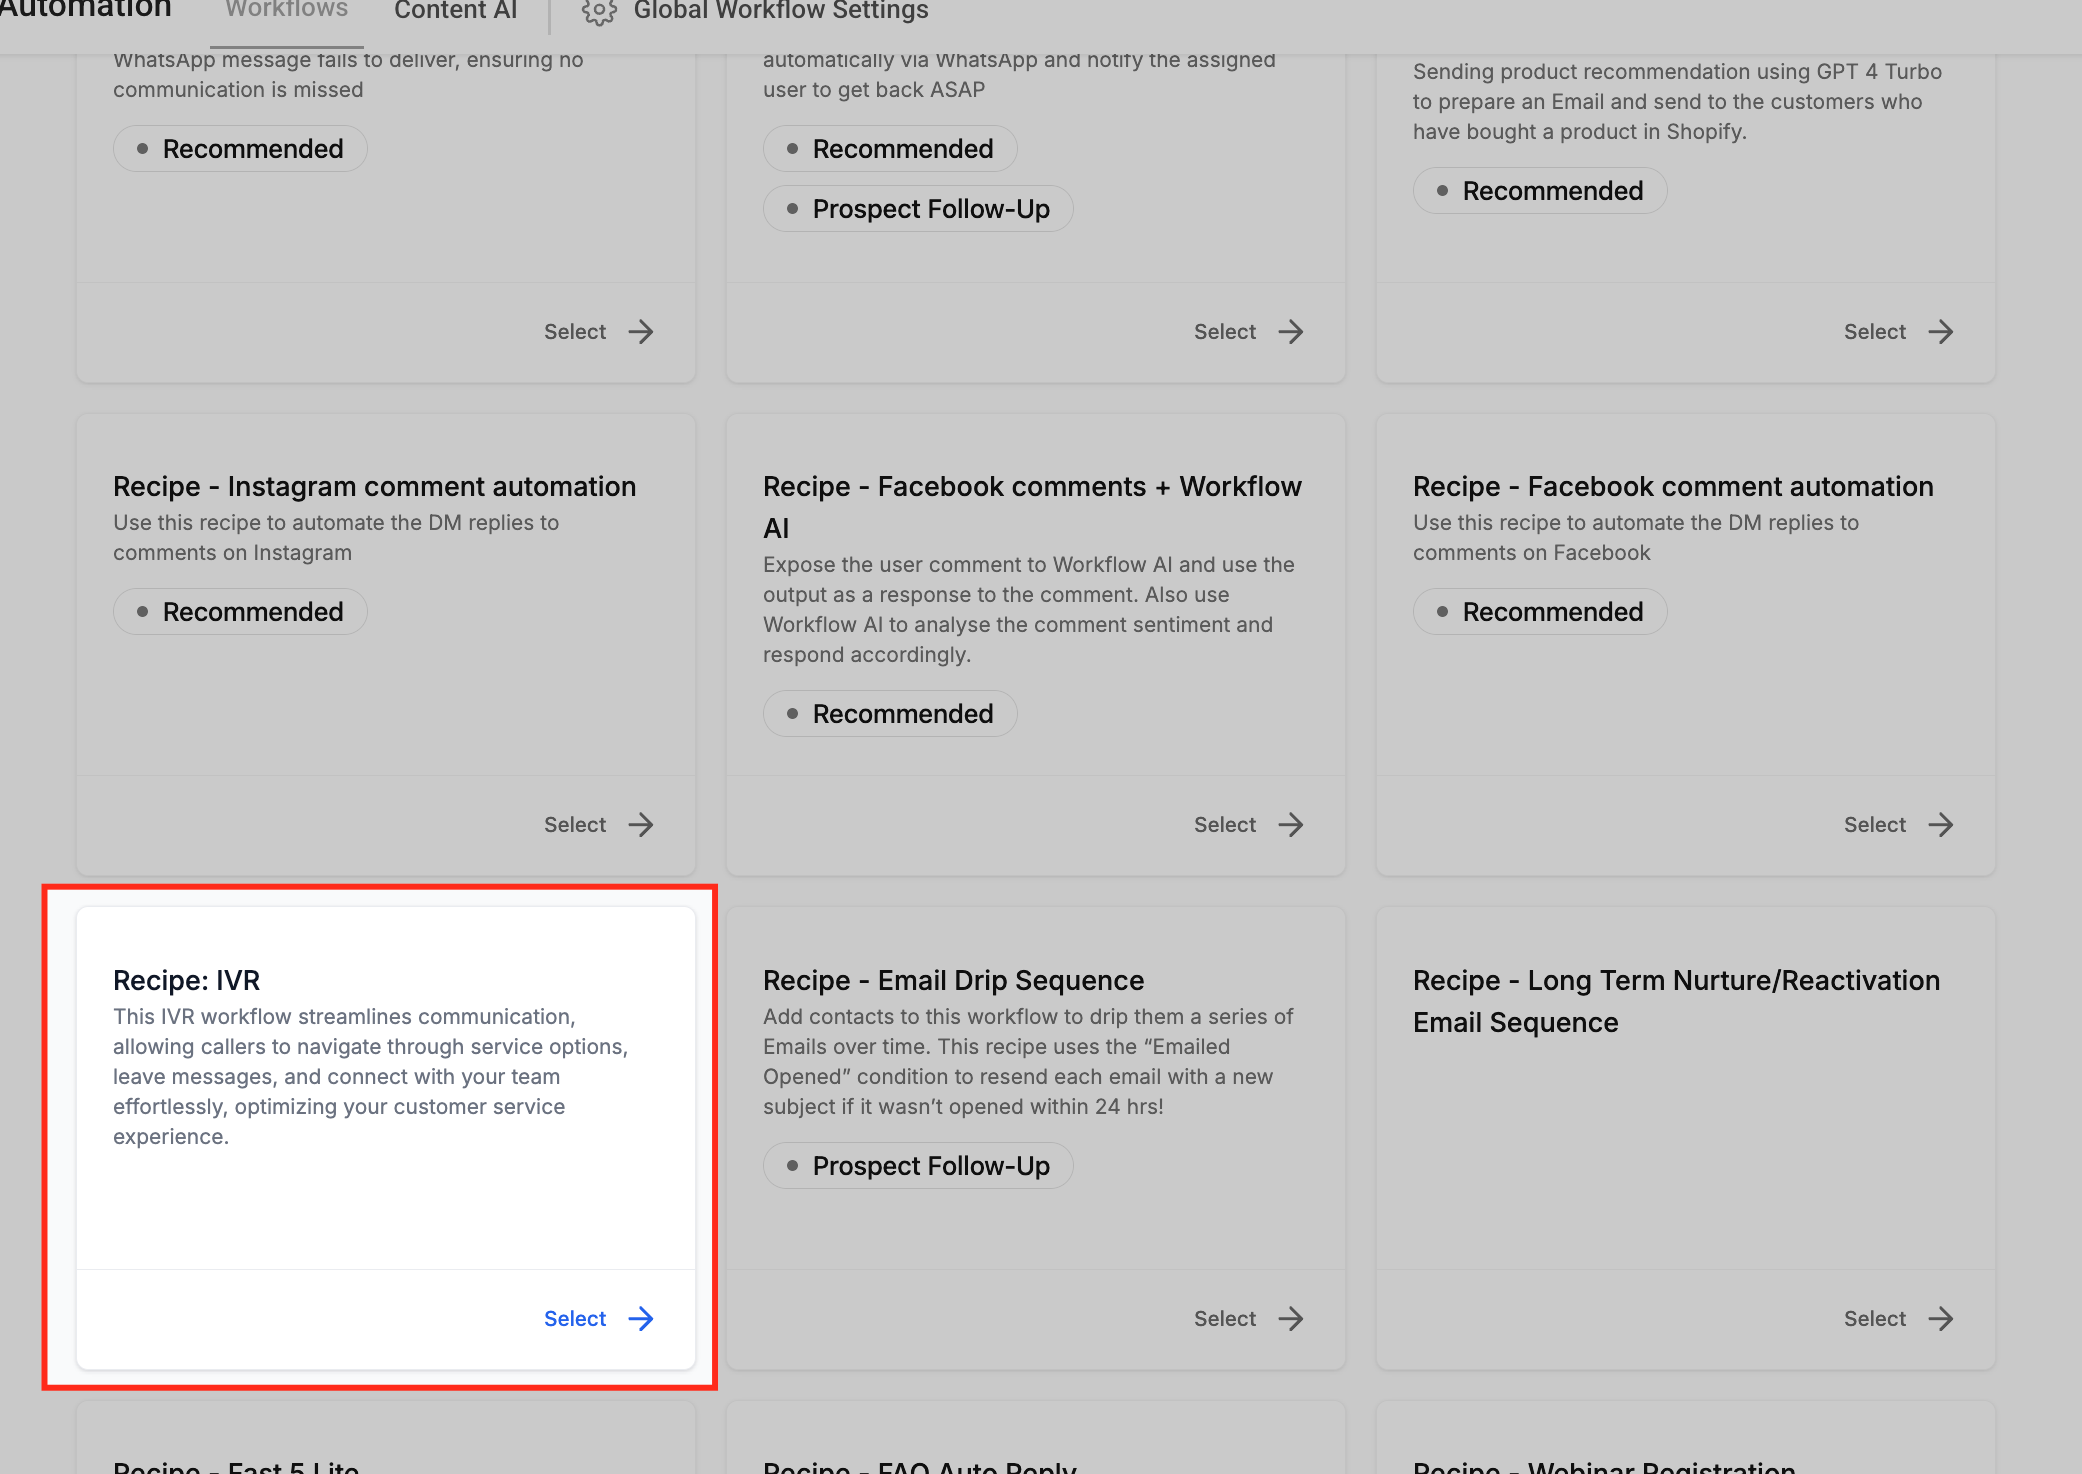
S****electing the IVR Workflow Recipe
Once inside the workflow creation section, use the recipe selection option to simplify setup. This recipe includes essential triggers, actions, and call routing logic, reducing the need for manual configuration. Select the IVR Workflow recipe and proceed to customize it based on your business needs.
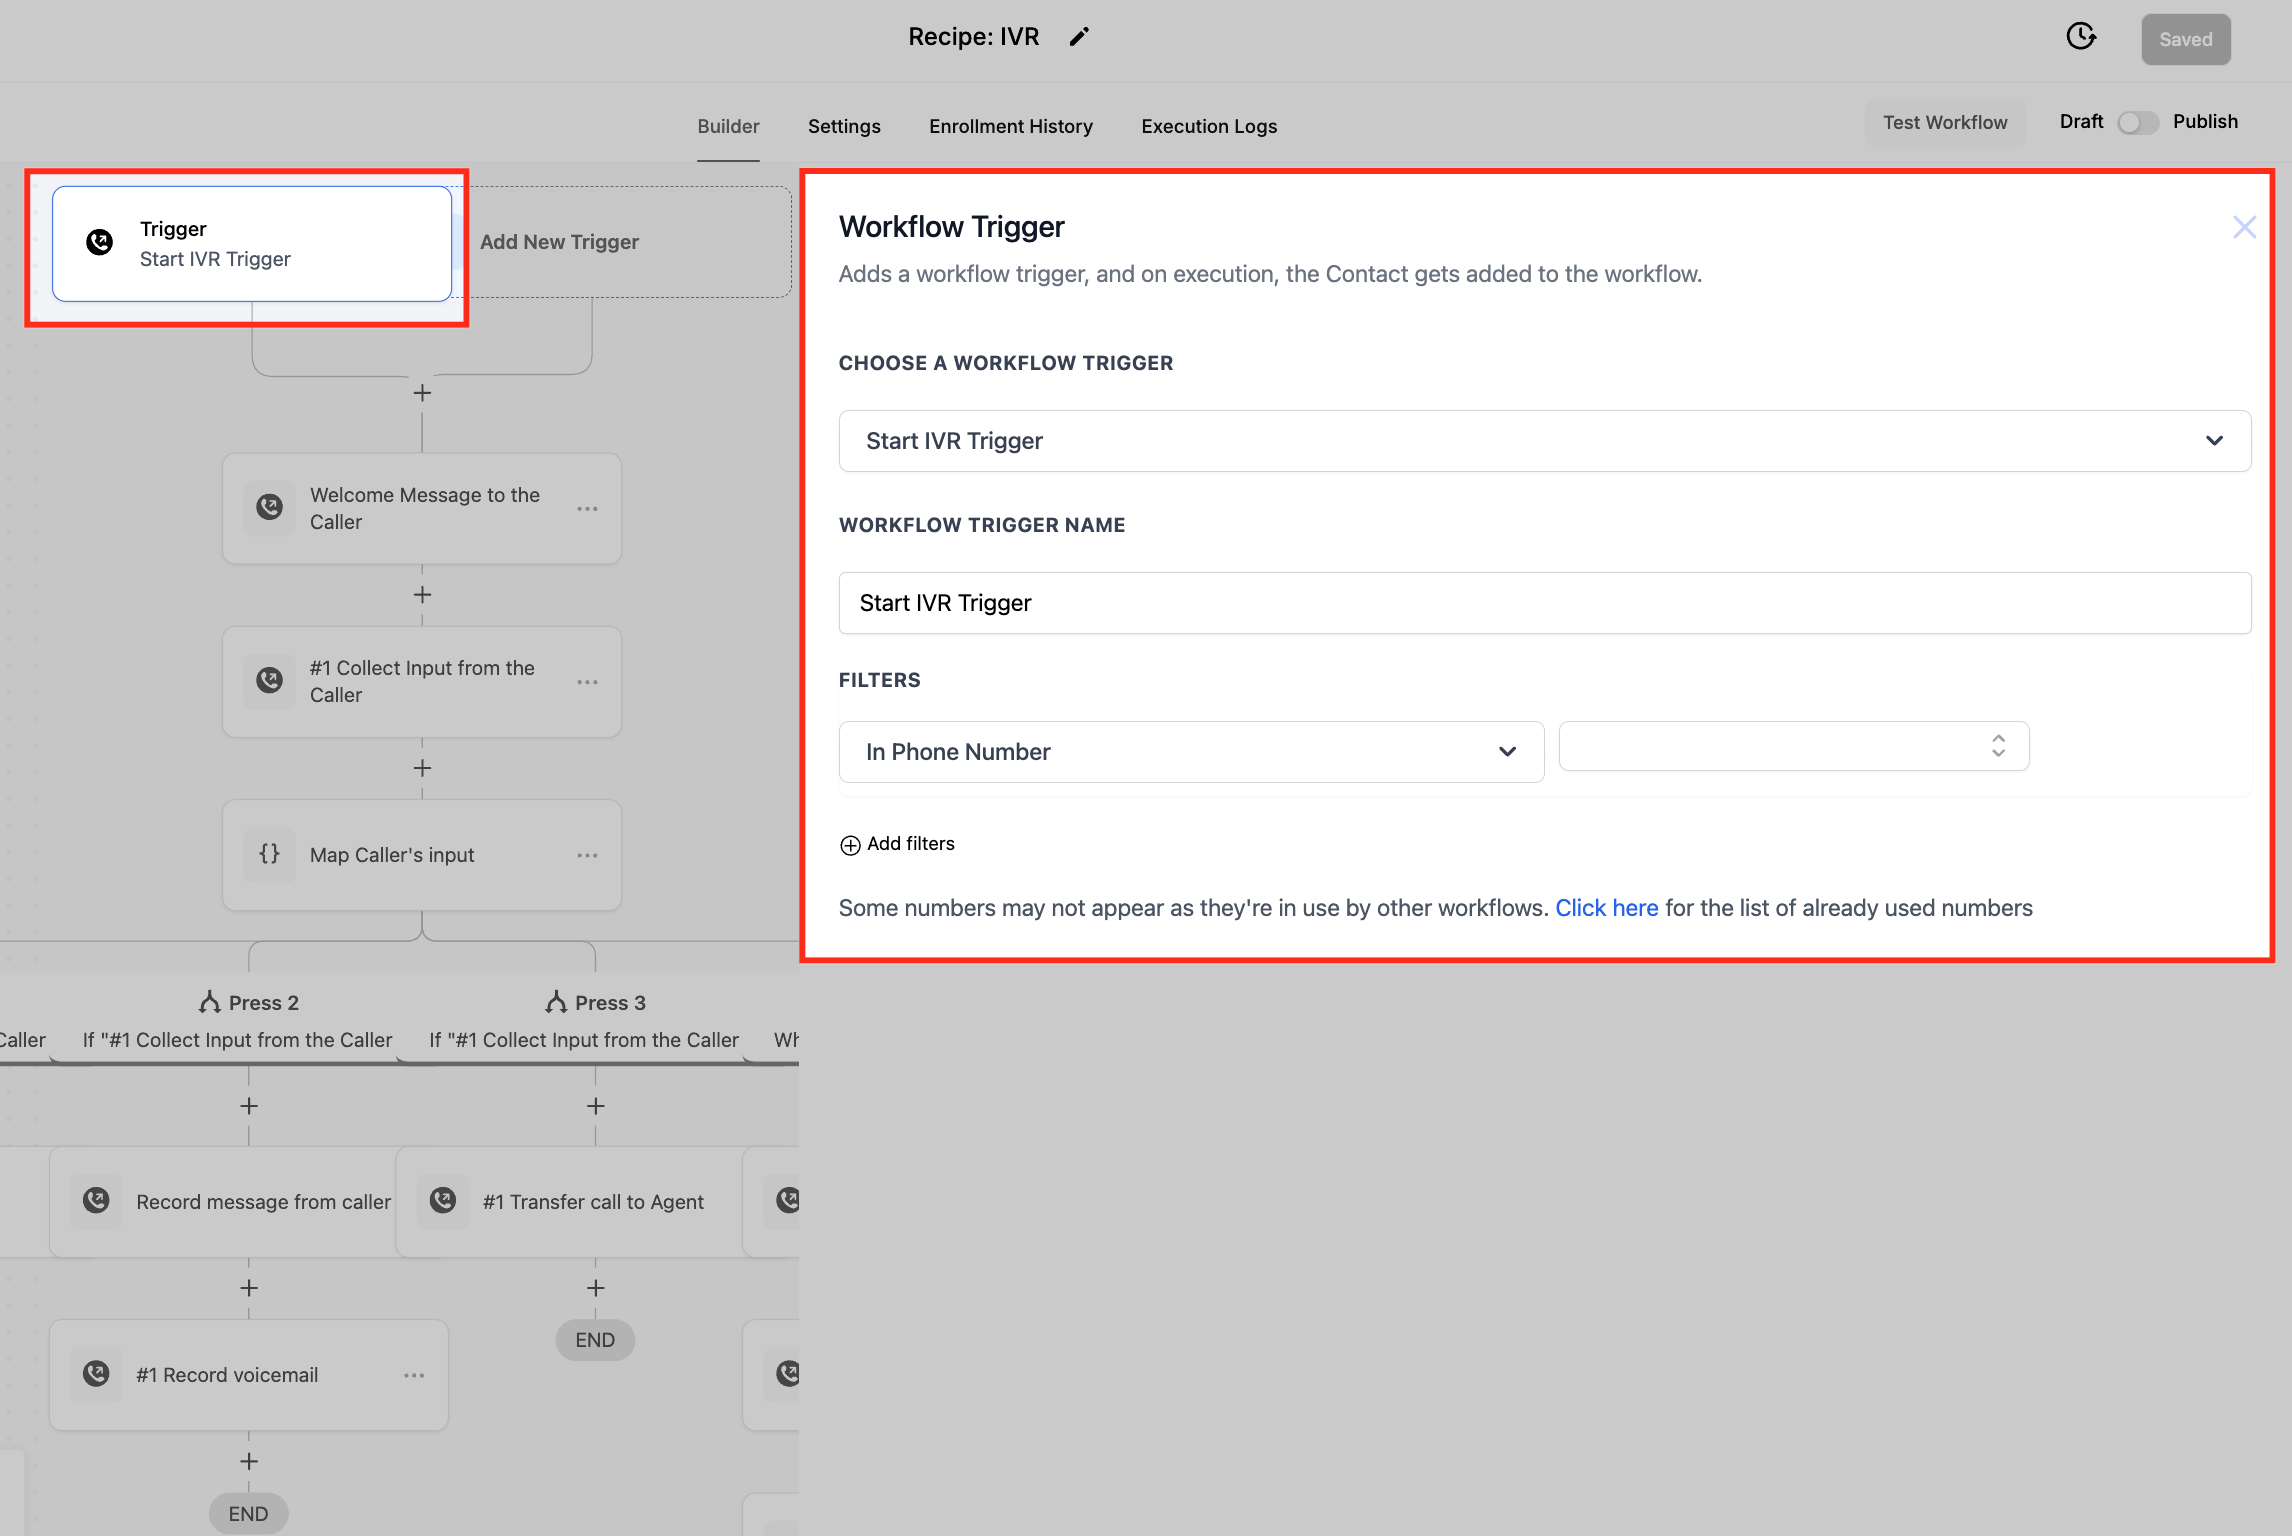
Customize the Trigger
Phone Number: In the workflow trigger settings, select the phone number that will be used for the IVR system. This ensures that incoming calls are properly routed to trigger the IVR workflow. If the number is not correctly mapped, the IVR system will not function. Subsequent IVR actions will rely on this configuration to guide callers through the automated process. When you click the dropdown, It shows all the available phone numbers of the users. you can choose one or more phone numbers.
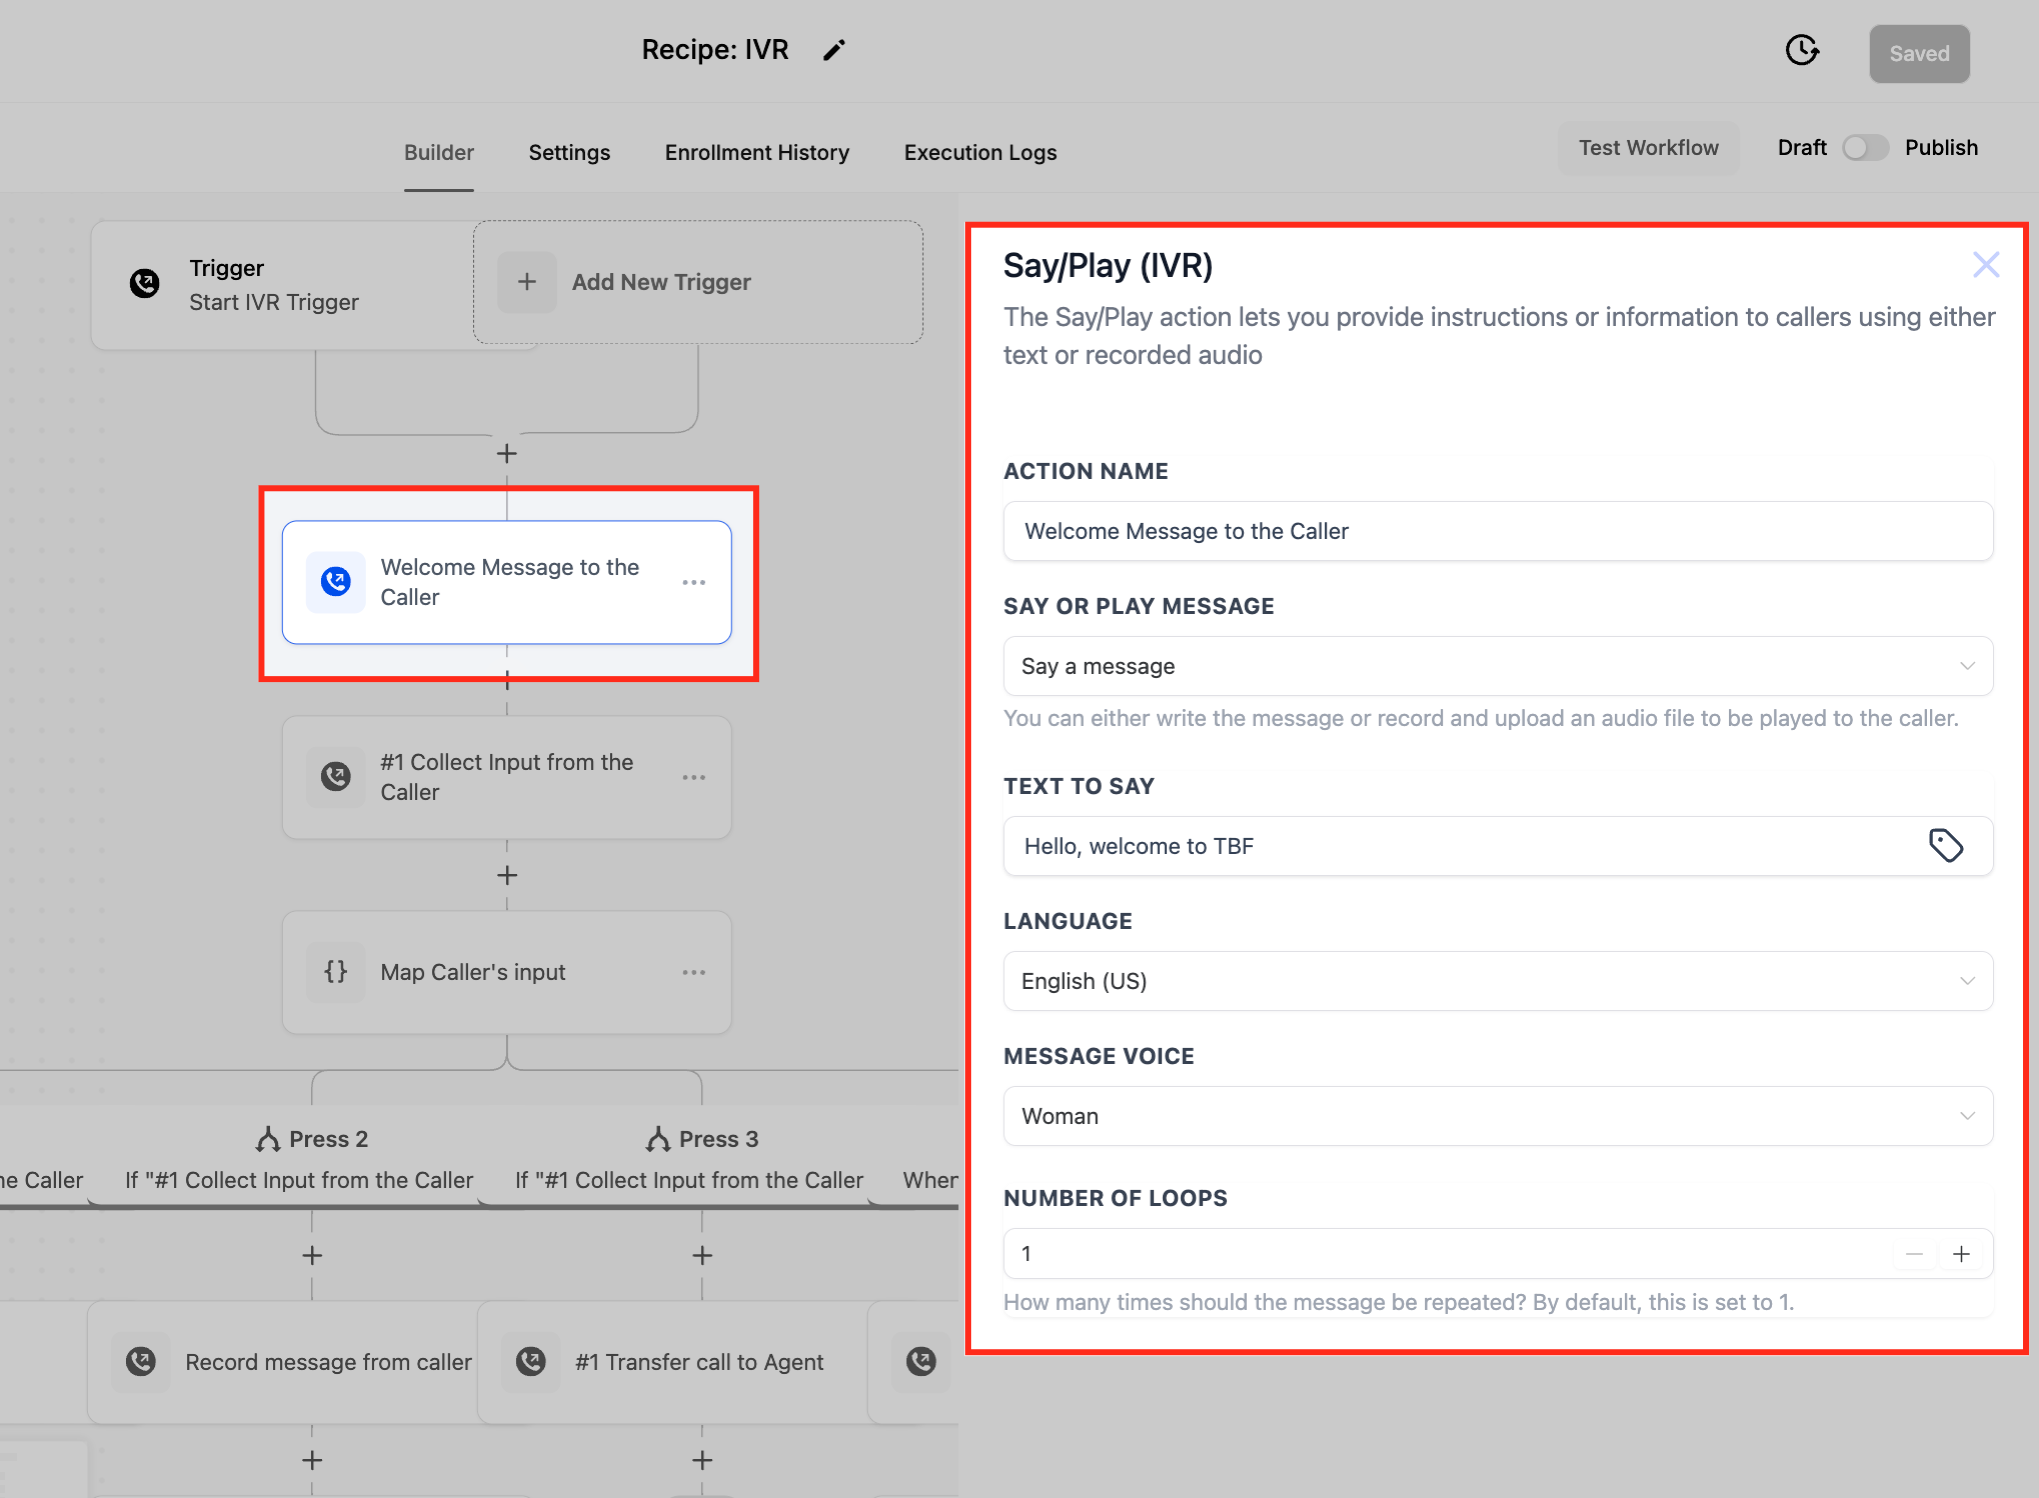
Say/Play Messages
Modify the text-to-speech or uploaded audio file in the workflow action settings to ensure the IVR delivers accurate and professional prompts to callers. This step allows you to customize greetings, menu options, and instructions for a seamless caller experience.
Call Routing Logic
Modify the input conditions within the IVR workflow to ensure callers are directed to the correct department or individual. Based on the keypress selections made by the caller, you can define specific routing paths, such as transferring calls to customer support, sales, or voicemail. This setup ensures an efficient and seamless caller experience. When you are done with the set up, Save and Publish the workflow to activate the IVR.
Method 2: Creating an IVR Workflow from Scratch (Full Customization)
For businesses with specific call routing needs, building an IVR system from scratch allows complete control over workflow design.
Step 1: Access Workflow Builder
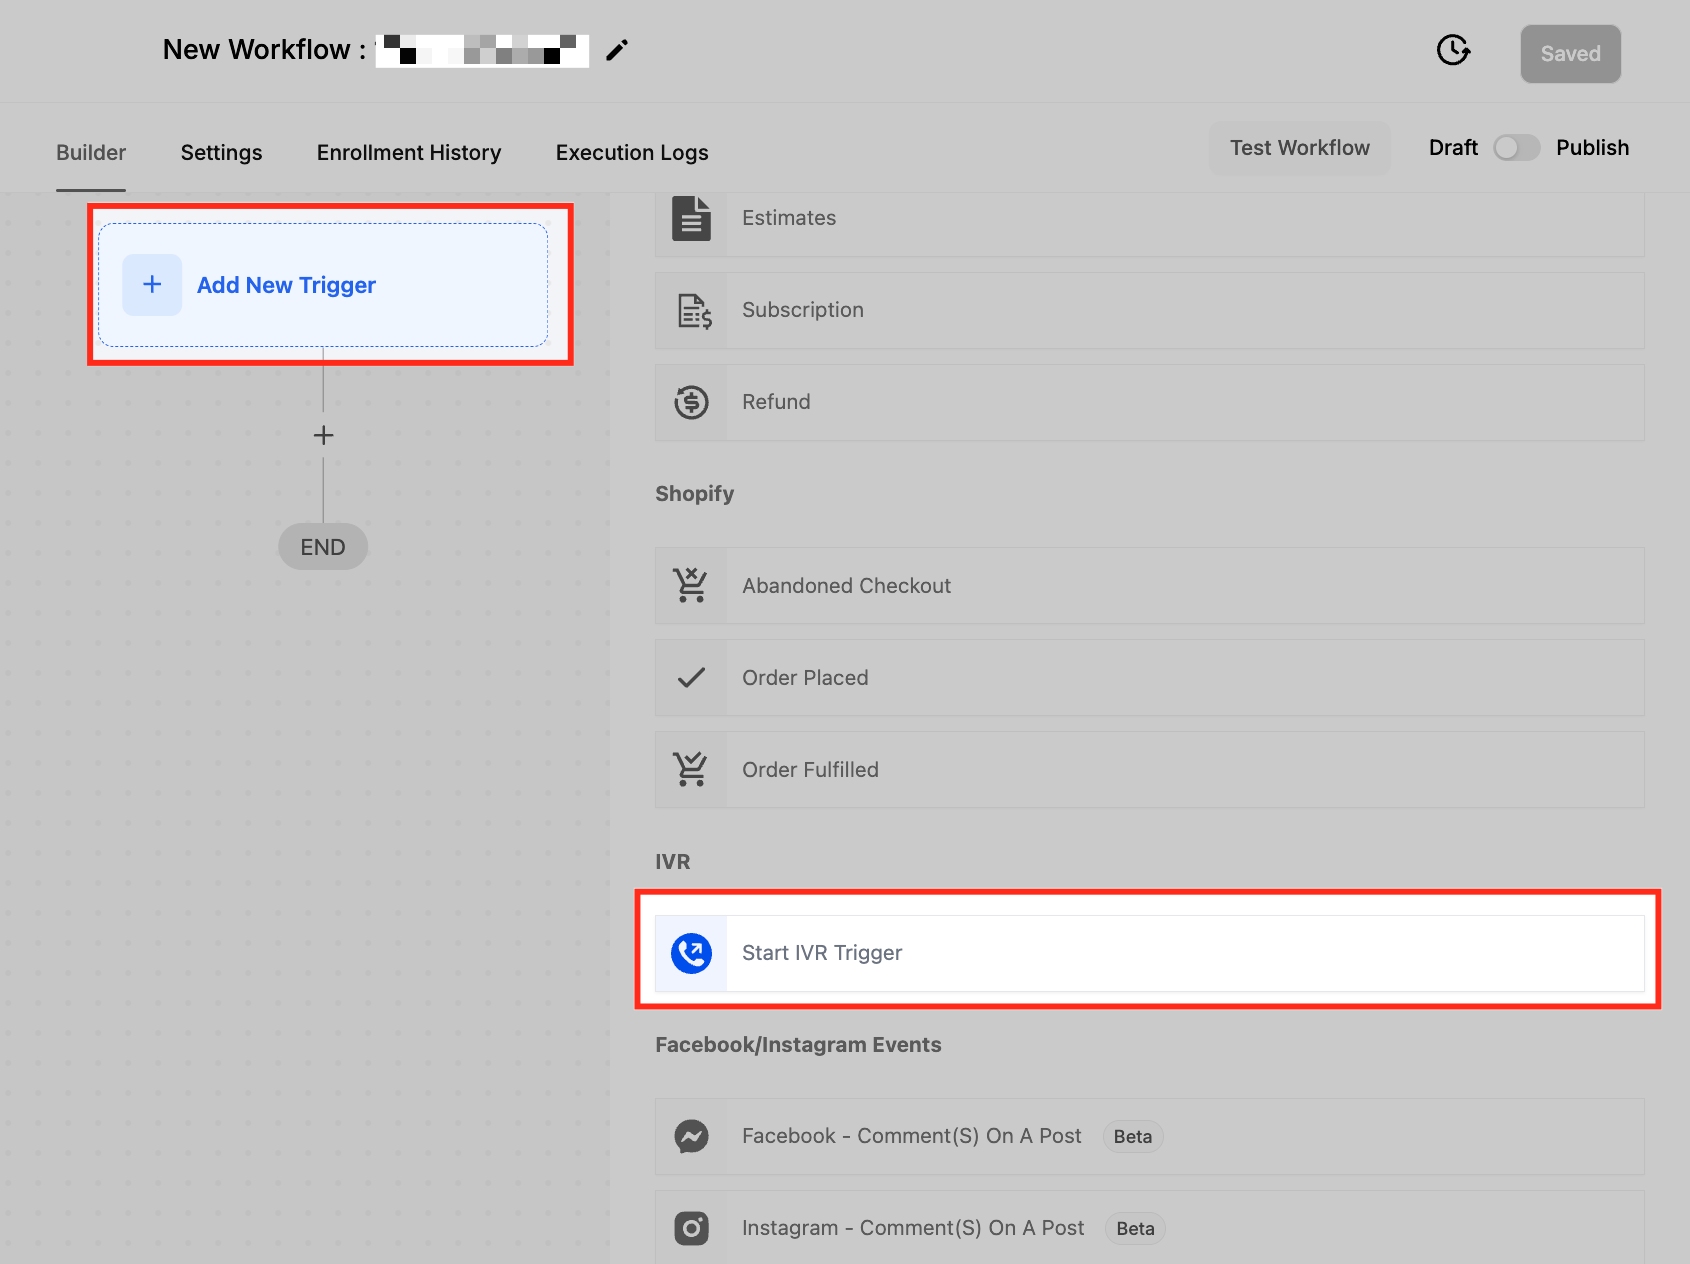
Go to Automation in your Kanamé account and click on ”+ Create Workflow” then click “Start from scratch” This will open the workflow builder, where you can configure your IVR system either from scratch or by using a prebuilt IVR workflow recipe.
Step 2: Add the IVR Trigger
Click on ”+ Add New Trigger” in the workflow builder and search for “Start IVR” from the list of available triggers. Selecting this trigger will enable the IVR workflow to activate when a call is received on the assigned phone number. This is the first step in configuring an automated IVR system to handle incoming calls efficiently.
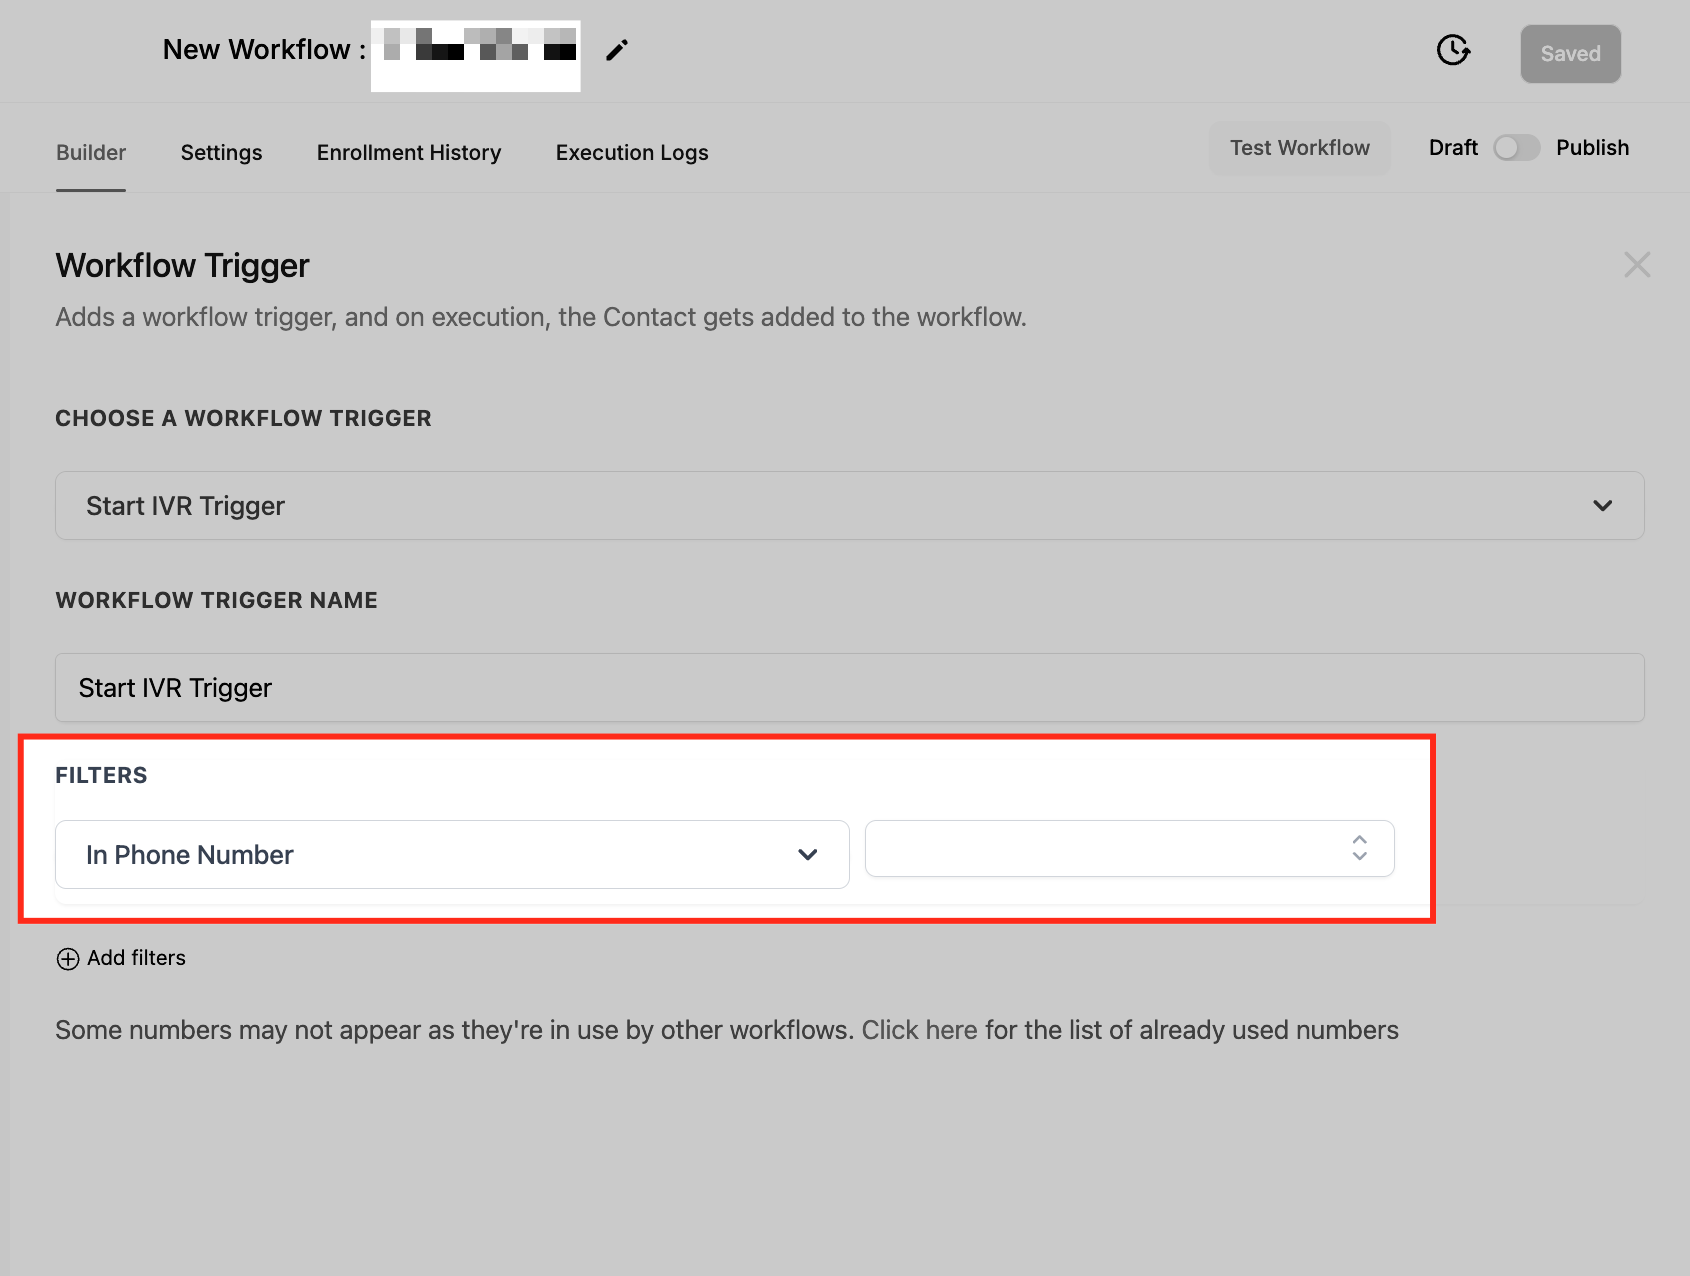
Step 3: Configuring Start IVR Workflow Trigger
Assigning a Phone Number
In the workflow trigger settings, select the phone number that will be used for the IVR system. Keep in mind that a phone number can only be assigned to one IVR workflow at a time. Once selected, click Save to confirm the configuration. This ensures that incoming calls to the assigned number will activate the IVR workflow.
Step 4: Configure IVR Actions
After adding the trigger, set up the actions to define how the IVR interacts with callers. Below are the available IVR workflow actions you can use for your workflow. In the next few steps, we will go through each IVR workflow action one by one.
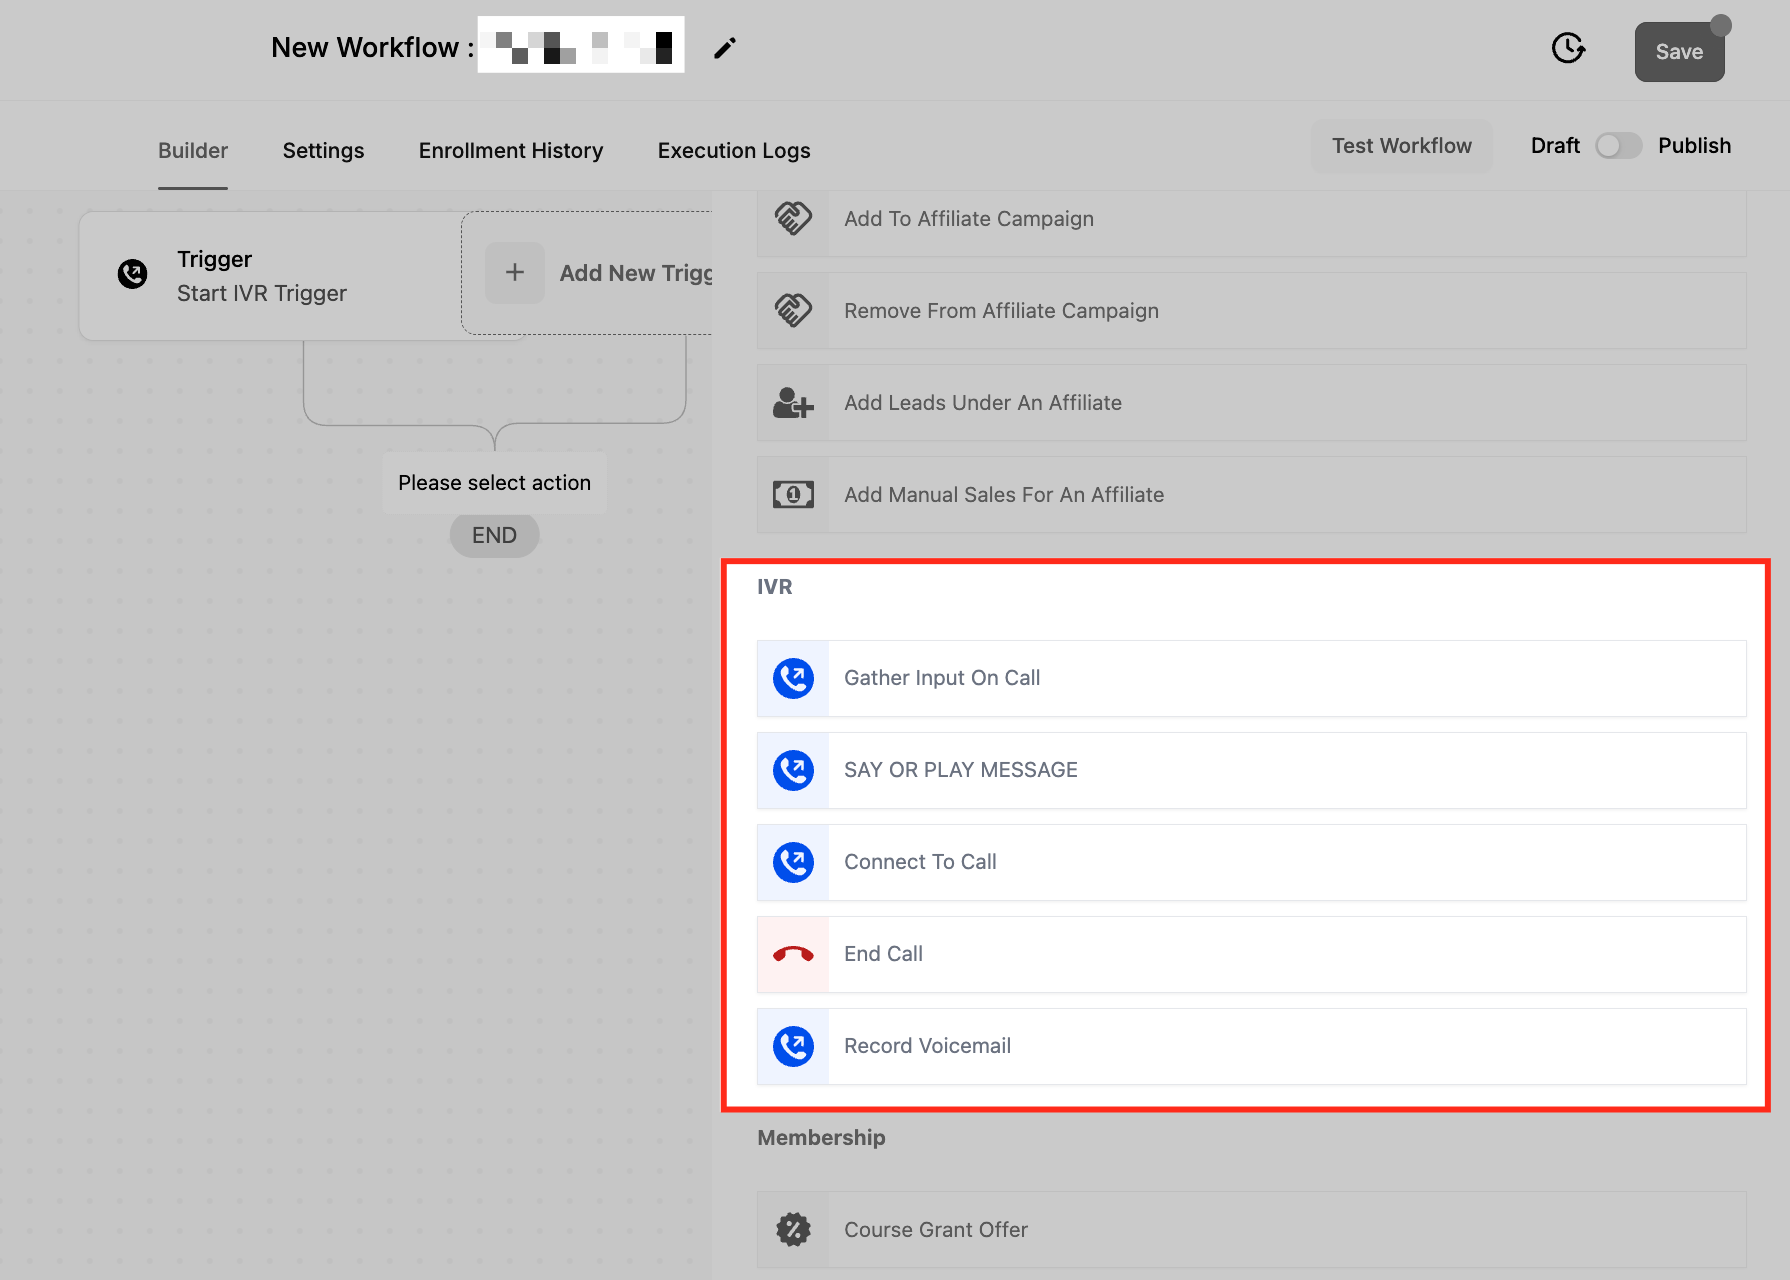
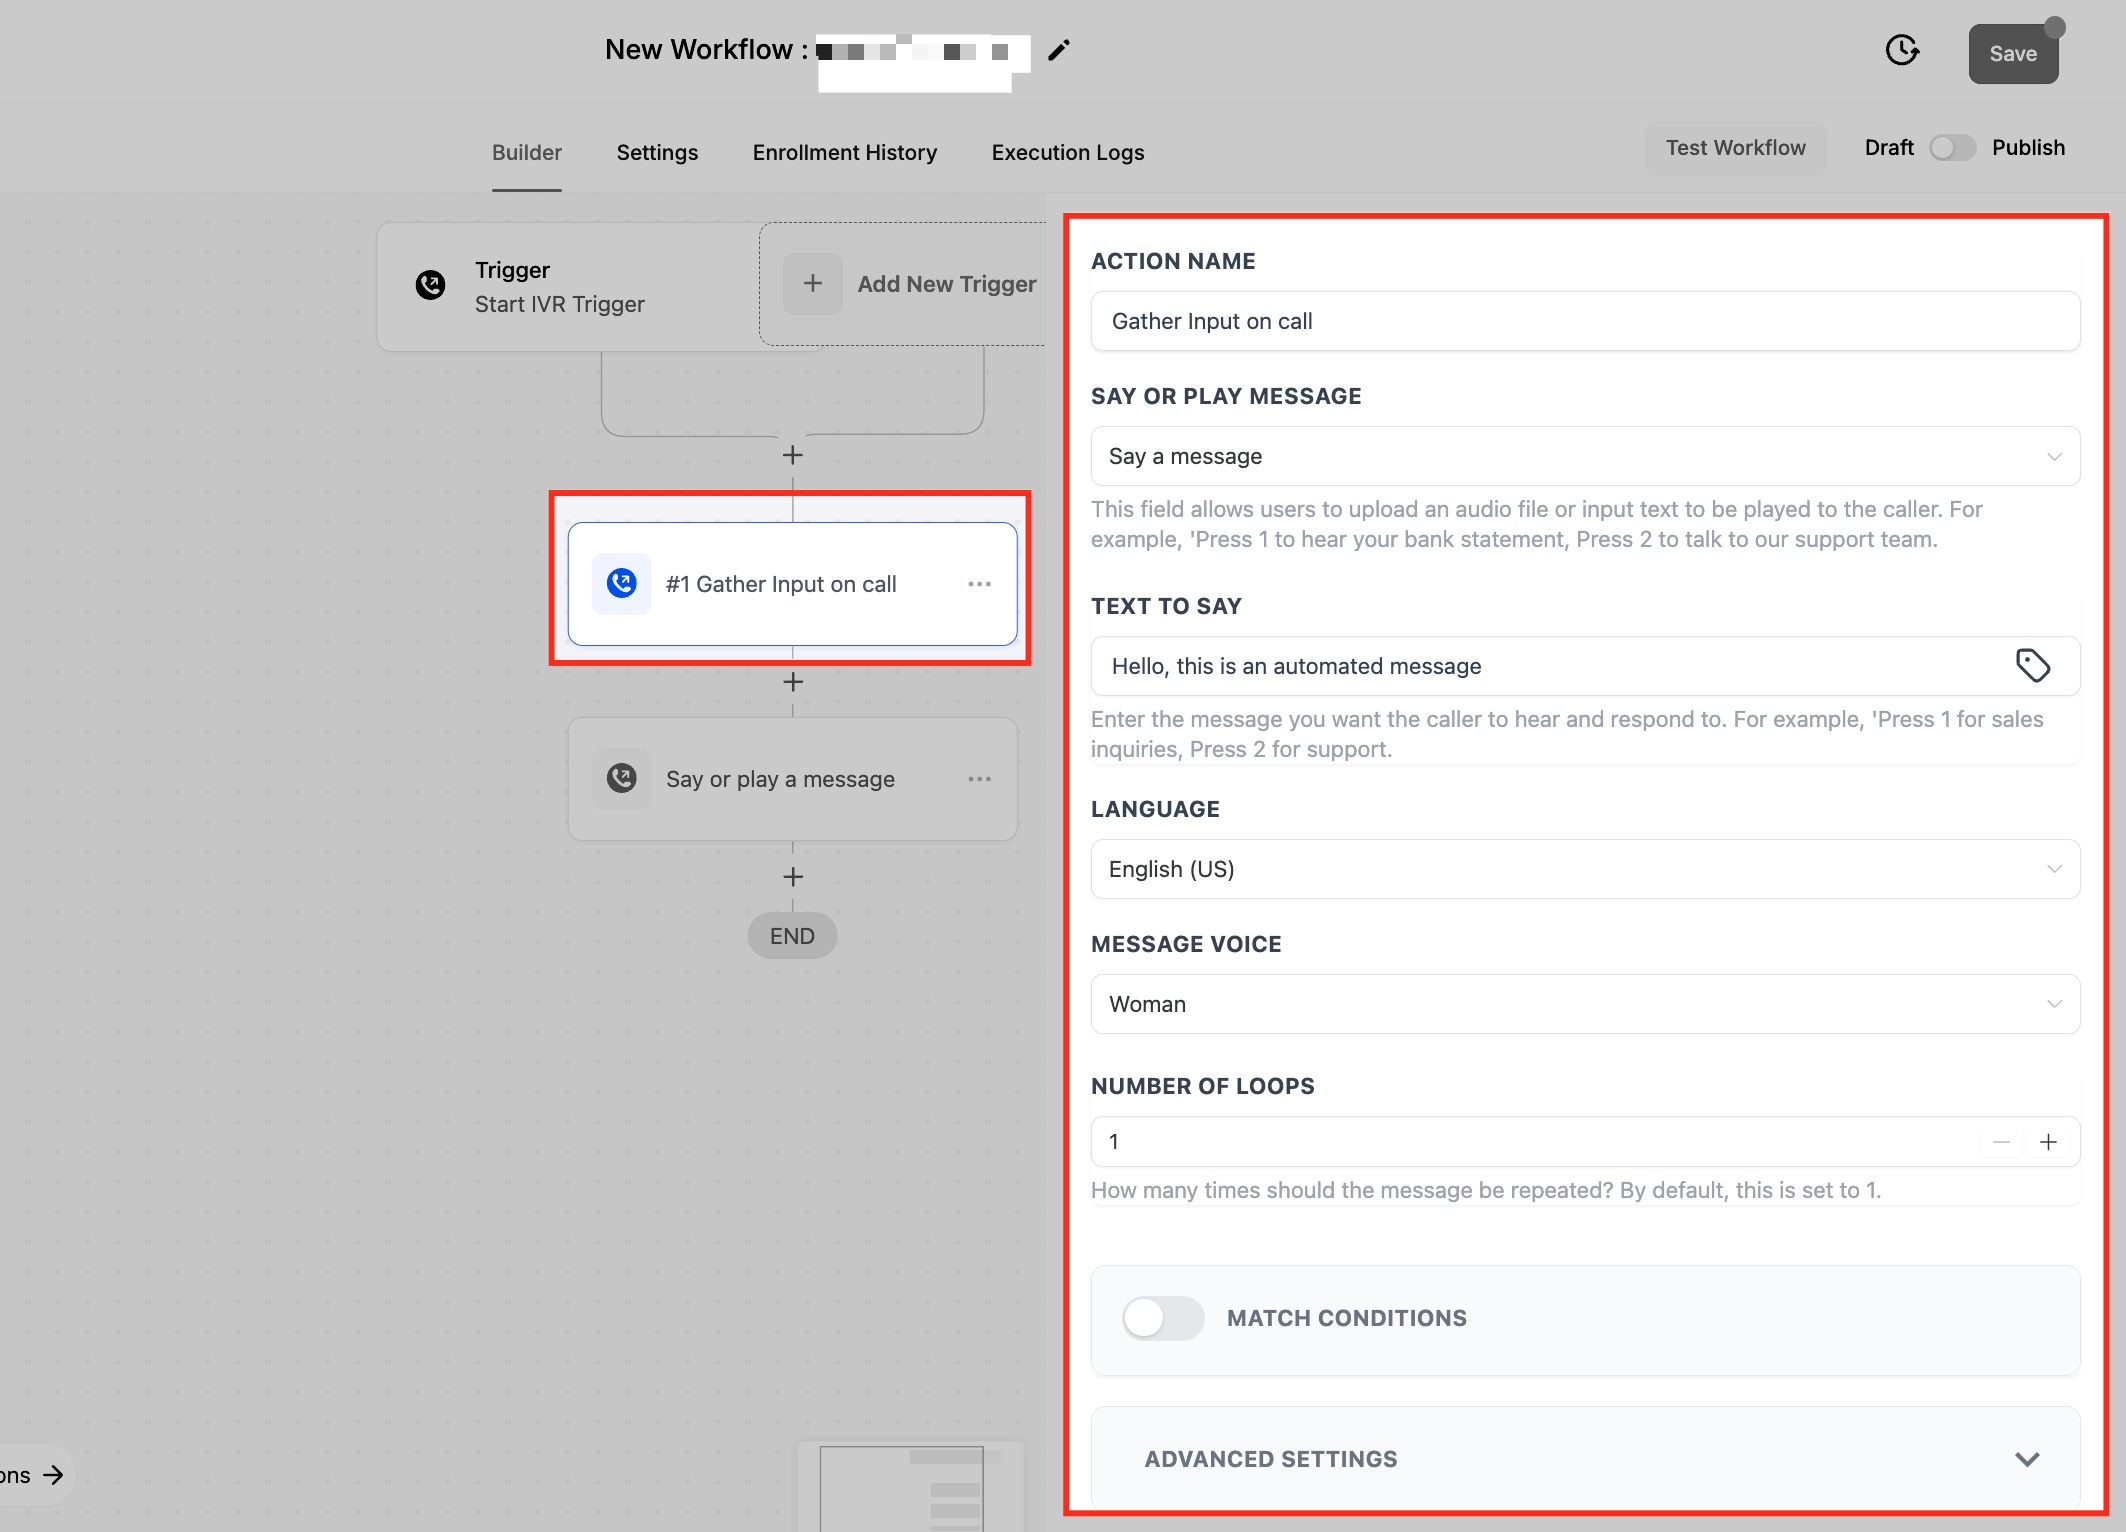
Gather Input on Call Workflow Action
The Gather Input on Call action allows businesses to collect caller responses through keypad inputs, enabling seamless navigation within the IVR system. This action is essential for directing callers to the appropriate department, retrieving account information, or processing customer requests efficiently.
When setting up this action, you can configure the following options:
- **Say or Play Message:**Choose how the IVR presents the message to callers:
- Say Message: Type a text message that will be converted to speech.
- Play Message: Upload a pre-recorded audio file for playback. Example, “Press 1 for account balance, Press 2 to speak with a representative.”
- Text to Say: Enter the specific message you want callers to hear before making a selection. This ensures clear instructions are given for the available options.
- Language & Message Voice: When using text-to-speech, the default language is US English. You can choose between a Male or Female voice to personalize the caller experience.
- Number of Loops: Determines how many times the message will be repeated before the system stops waiting for a response. This helps ensure callers have enough time to understand and react to the prompt. Match Conditions
The “Match Conditions” Toggle is used to define how the system processes caller input and directs them to the appropriate workflow path based on keypress responses. When Match Conditions is enabled, it allows you to create multiple branches based on different keypress inputs from the caller. Each branch represents a possible response, guiding the caller through specific actions based on their selection.
Components of Match Conditions:
-
Branch Name: A descriptive label for the keypress action.Example: “Caller Pressed 1” or “Caller Pressed 2”
-
On Key Press: Defines the key that a caller must press to follow a particular branch.Example: If the caller presses 1, they will be directed to one action; if they press 2, they will follow another action.
-
None Branch: Defines what happens if the caller does not press a valid key.Example: If the caller presses an invalid key (not 1 or 2), they can be routed to a default action, such as hearing the menu again or being redirected to a human agent. Advanced Settings for Input Collection
-
Stop Gathering After (Seconds): Set the time limit for caller input, ranging from 5 to 30 seconds. If no input is received within this time frame, the system will proceed accordingly.
-
Stop Gathering on Key Press: If enabled, input collection stops immediately after the caller presses a key. If disabled, the system will wait until either the time limit is reached or the expected number of keypresses is collected.
-
Stop Gathering After (Digits): Specify how many digits the system should expect from the caller. Once this number is reached, the input is submitted automatically.
Say/Play Message Workflow Action
The Say/Play Message action allows businesses to provide instructions or important information to callers using either text-to-speech or a pre-recorded audio file. This action plays a crucial role in guiding callers through the IVR system by delivering automated messages before prompting them for input or directing them to the next step. This action ensures that callers receive clear instructions, whether through automated speech or recorded messages, improving the overall IVR experience.
When configuring this action, you can customize the following settings:
- Say or Play Message: Choose between two options:
- Say Message: Type a text message that will be converted into speech and played to the caller.
- Play Message: Upload a pre-recorded audio file that will be played instead of text-to-speech.